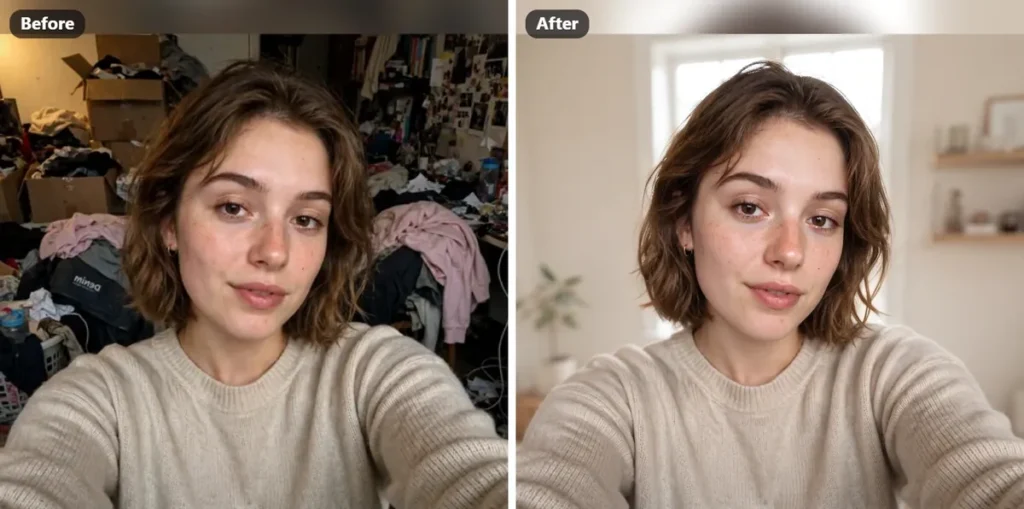
Everyone loves a good transformation photo. But here is the part most people miss: the edit itself is only half of before after photo editing. The other half is how you show it. A strong edit posted on its own looks like any other nice photo. The same edit placed next to the original becomes proof, and proof is what people stop for, save and share.
In this guide you will learn the full process: how to edit your photo the right way, how to keep it honest, and how to present the result so the change is impossible to miss.
What Is Before After Photo Editing?
It means improving a photo and then presenting the original and the edited version together, so the viewer can compare them in one look. The editing part can be anything: fixing light, removing dullness, restoring an old family photo, cleaning the background, or creating a full AI portrait from a plain selfie. The showing part is always the same: the before photo and the after photo, side by side, at the same size.
This format works because it removes doubt. Anyone can claim a filter did magic. A clean side by side pair shows exactly what changed and what stayed the same.
How to Do Before After Photo Editing (Step by Step)
Step 1: Choose the right starting photo. Pick a photo where the problem is clear: dull light, a messy background, faded colours, or an old damaged print. The clearer the starting point, the stronger the final comparison.
Step 2: Edit with a prompt, not random filters. AI editing gives you control that one-tap filters never will. Tell the AI exactly what to change and exactly what must stay the same. If you are starting from zero, build your first prompt in our Gemini AI prompt generator and adjust it to your photo.
Step 3: Always protect the face. The most common editing mistake is an after photo where the person looks like someone else. Add a clear line to every prompt: keep the face exactly the same as the reference photo. A before and after pair only impresses when it is obviously the same person in both.
Step 4: Use the right prompts for quality fixes. For old, blurry or low quality photos, use prompts made for enhancement and restoration. Our photo quality enhancer prompts are written for this job, and they keep the person natural instead of plastic.
Step 5: Compare before you post. Put the two photos side by side and look honestly. If the after photo needs a second edit, do it now. One careful pass beats three rushed ones.
How to Show Your Result the Right Way
Once the edit is ready, presentation decides whether anyone notices. Posting the two photos separately buries the story, because most viewers will only ever see one of them. Combine them into a single image instead.
Our free before after photo maker was built for exactly this step. Add the original photo as Before and the edited photo as After, drag them into place, keep the labels on, choose the size for your platform and download. Your photos stay on your device, because the tool runs in your browser.
Two small habits make the pair stronger. First, keep both photos the same height, so the faces line up. Second, never hide the before photo. The honest pair always performs better than the polished single shot, because the viewer can trust it.
4 Mistakes That Ruin a Before and After Edit
1. Editing too much. Skin turned to plastic and colours pushed too far make the after photo look fake, and fake results get ignored.
2. Different angles in the pair. If the before and after photos were taken from different positions, the comparison feels rigged even when it is not.
3. Cropping the face. A cut-off forehead or chin in either photo makes the whole post look careless. Use a maker that shows the full photo.
4. Forgetting the labels. Without Before and After labels, half your viewers will not understand which photo is which, and the post loses its point in the first second.
FAQs
What is the best way to edit a before and after photo?
Edit with a clear prompt that names what to change and what to keep the same, especially the face. Then present both photos side by side at the same size, with labels, so the change can be judged in one look.
Can I do before after photo editing on my phone?
Yes. The prompts work in the Gemini or ChatGPT app, and the collage step works in your mobile browser. No computer is needed for any part of the process.
Do I need Photoshop for before and after pictures?
No. AI prompts handle the editing, and a free online maker handles the side by side layout. Photoshop is only needed for heavy professional retouching.
Why does my after photo look like a different person?
That happens when the prompt does not protect the face. Add a line that the face must stay exactly the same as the reference photo, and lower any beauty or glamour wording in the prompt.
Conclusion
Before after photo editing is a simple two-part skill: edit carefully, then show honestly. Keep the face the same, fix only what the photo needs, and present the pair in one clean image. When you are ready to show your result, open the before after collage maker, add your two photos, and post a result people can actually see.
